Showing posts with label condiments. Show all posts

Wednesday, May 29, 2013

Chipotle-Chili Tartar Sauce

This is an excellent all purpose sauce for adding a little smokiness/spiciness to burgers or whatever else you choose. Sometimes when I have people over to eat, but I want to keep things simple, I make something plain and then have a few sauces/spreads available so everyone can choose whichever one they like. It's nice because you can whip them up quickly the day before and they're ready to go.

CHIPOTLE-CHILI TARTAR SAUCE
Yield: approx. 1 ¼ cups

3/4 cup mayonnaise
2 tablespoons extra-virgin olive oil
2 tablespoons minced red onion
2 tablespoons chopped fresh cilantro or dill
1 tablespoon minced canned chipotle chilies in adobo (or more to taste)
1 tablespoon drained capers
salt and freshly ground black pepper to taste


Whisk everything together in small bowl. Can be made 2 days ahead; Cover and chill.

barely tweaked from Bon Appétit (originally from Hal’s Bar & Grill, Venice, CA)
can of chipotle chilies in adobo sauce
all the ingredients ready to mix

The original recipe called for dill, but based on
the reviews, I used cilantro (and did not regret it).
chipotle-chili tartar sauce
generously slathered on a burger...
...and hot dogs
.

Friday, April 19, 2013

Salted Caramel Sauce

Apparently I'm a freak for caramel + salt because I've already made salty caramels and salty caramel ice cream and I still felt the need to make this salted caramel sauce. I'd say somebody stop me, but please don't. Clearly salt and caramel are the Burt and Ernie of the dessert world. And just like Burt and Ernie, this sauce will send you to your happy place and make you feel like a kid again. Or maybe that's just me (I can't help it, every time Burt gets suckered by Ernie all seems right with the world).


SALTED CARAMEL SAUCE
Yield: 2 cups

2 cups granulated sugar
12 tablespoons unsalted butter, at room temperature, cut into pieces
2 1/2 teaspoons fleur de sel (or any other flaky sea salt)
1 cup heavy cream, at room temperature


1.      Add the sugar in an even layer over the bottom of a heavy saucepan, with a capacity of at least 2 or 3 quarts. Heat the sugar over medium-high heat, whisking it as it begins to melt. You'll see that the sugar will begin to form clumps, but that's okay. Just keep whisking and as it continues to cook, they will melt back down.
2.      Stop whisking once all of the sugar has melted, and swirl the pan occasionally while the sugar cooks.
3.      Continue cooking until the sugar has reached a deep amber color. It should look almost a reddish-brown, and have a slight toasted aroma. This is the point where caramel can go from perfect to burnt in a matter of seconds, so keep a close eye. If you are using an instant-read thermometer, cook the sugar until it reaches 350º F.
4.      As soon as the caramel reaches 350º F, add the butter all at once. Be careful, as the caramel will bubble up when the butter is added. Whisk the butter into the caramel until it is completely melted.
5.      Remove the pan from the heat and whisk in the fleur de sel. Slowly pour the cream into the caramel. Again, be careful because the mixture will once again bubble up ferociously.
6.      Whisk until all of the cream has been incorporated and you have a smooth sauce.
7.      Set the sauce aside to cool for 10 to 15 minutes and then pour into your favorite glass jar and let cool to room temperature. You can refrigerate the sauce for up to 2 weeks. Warm the sauce up before using.

sugar (starting to get clumpy)
sugar getting even clumpier

I have to admit, I didn't give my sugar the attention I should
have because I was cooking something else at the same too. If
you whisk continuously, yours probably won't get quite as clumpy.
sugar get very melty
caramelized sugar
adding the butter
butter mostly melted
butter whisked in until smooth
cream added

I can't account for the color change here. I would
have thought adding cream would have made it lighter,
but instead it got a little darker.
adding the salt

The original recipe called for the salt to be added after the
cream, but I re-ordered the recipe because the salt doesn't melt
and I wasn't crazy about the crunchy chunks of salt in the sauce.
salted caramel sauce
.

Monday, April 15, 2013

Spicy Maple Mayonnaise (on Chicken & Waffle Sandwiches)

I came across a recipe for chicken & waffle sandwiches that looked fantastic. Only I didn't have time to make the fried chicken from scratch and I had some fancy waffle mix burning a whole in my kitchen cabinet, so I cheated and took shortcuts. I used Bell & Evans chicken tenders and the aforementioned waffle mix and proceeded to follow the rest of the original recipe. The only part I made from scratch was this spicy maple mayonnaise, which I recommend trying. It was scrumptious and I'm sure it taste great on all kinds of sandwiches.
 
SPICY MAPLE MAYONNAISE
Yield: 1 ¼ cups

1 cup mayonnaise
1/4 cup pure maple syrup
1/2 teaspoon mustard powder
1 teaspoon horseradish
dash or two of hot sauce (such as tabasco)


Mix all ingredients together until smooth. Can be made 1-2 days ahead.

barely adapted from foodnetwork.com by Julie Ohnstad, Atlanta, GA
all the ingredients
spicy maple mayonnaise


CHICKEN & WAFFLE SANDWICHES FOR CHEATERS & SHORTCUT TAKERS
Yield: 4 servings

8 waffles, kept warm
12 slices applewood smoked bacon, cooked until crispy and drained
12 Bell & Evans breaded chicken breast tenders, cooked according to package directions
8 slices sharp cheddar
Spicy Maple Mayonnaise (recipe above)

1.      Preheat broiler.
2.      Lay 4 waffle halves on a sheetpan. Top each with 3 chicken tenders, 3 slices bacon and 2 slices cheddar.
3.      Broil the sandwiches just until the cheese melts (careful, it doesn’t take long).
4.      Spread about 3 tablespoons spicy maple mayonnaise on the top waffle and place on the sandwich.
waffles
chicken tenders
bacon
cheddar
melted
spicy maple mayonnaise on waffle
chicken & waffle sandwich
.

Wednesday, January 2, 2013

Rao's Marinara Sauce

I consider this both a "favorite things" post and a recipe post because Rao's is hands down my favorite jarred marinara sauce ever. Some of you may have seen it at the grocery store and just kept walking because it's pretty pricey. Okay, very pricey. I've seen the larger jars sell for over $10. But I would submit to you that if you have the money in your budget, it's worth it. And it does go on sale sometimes. It was only $5.99 the other day at the A&P, so I bought 10 jars. Okay, it was 12 jars. I felt a little stupid at the register, but now I feel comforted knowing they're in my basement. I feel the same way about our fifty pack of toilet paper and my industrial size box of tampons. 

Now even though Rao's jarred sauce is great, I do like to make homemade sauce when I can, so it occurred to me that maybe I could find the Rao's recipe online. I didn't have to look far (it's on their website). So I made it and it rivaled the jarred stuff (which is a weird thing to say because usually it's a miracle if something in a jar can compare to homemade, not the other way around). But in this case, rivaling the jar was a good thing. But don't take my word for it, go ahead and give it a try.


RAO’S MARINARA SAUCE
Yield: 7 cups

4 (28 oz.) cans imported Italian plum tomatoes with basil, preferably San Marzano
1/2 cup extra virgin olive oil
4 oz. fatback or salt pork, cut in small pieces (optional)
6 tablespoons minced onion
4 garlic cloves, peeled and minced
salt to taste
12 leaves fresh basil torn, optional
pinch dried oregano
black pepper, to taste
___________________________________________________________________

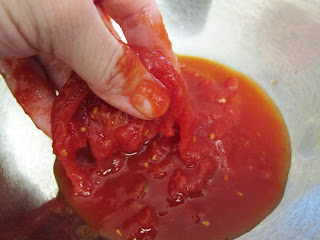
1.      Remove tomatoes from the can, reserving the juice in which they are packed. Using your hands, crush the tomatoes, gently remove and discard the hard core from the stem end and any skin or tough membrane. Set aside.
2.      Put oil in a large saucepan over medium-low heat. If using fatback, add to the pan and saute for about 5 minutes or until all fat has been rendered. Remove and discard fatback.
3.      Add onion and saute for 3 minutes or until translucent and just beginning to brown.
4.      Stir in garlic and saute for 30 seconds or until just softened.
5.      Stir in tomatoes, reserved juice, and salt. Raise heat, and bring to a boil. Immediately reduce heat to a very low simmer and cook for about 1 hour or until flavors have combined and sauce is slightly thickened. If you prefer a thicker sauce, cook for an additional 15 minutes.
6.      Stir in basil, oregano, and pepper, and cook for an additional minute. Remove from heat and serve.

jar of Rao's marinara sauce
(available at most supermarkets)
ingredients from the back of the jar

Obviously they don't use the pork
when they make this to sell in jars.
These were the only San Marzano tomatoes I could find.
crushing the tomatoes
salt pork
removing cooked salt pork
cooking onions
adding garlic
adding tomatoes
mixed and cooking
adding basil, oregano and pepper
homemade Rao's marinara sauce
.