Wednesday, July 24, 2013

Frozen Hot Chocolate

I've never been to Serendipity 3, the home of original frrrozen hot chocolate (I'm not taking any liberties - they spell it with three R's). But I've heard good things, so I made this version at home. It was very quick to put together (I hadn't even planned on making it, but just happened to have all the ingredients on hand). It turned out to be the perfect treat for a way too hot summer day. It's basically a frappuccino for kids or people who don't drink coffee. As a matter of fact, it would taste great with a shot of cold espresso or maybe some booze. Yes, some booze.


SERENDIPITY’S FRRROZEN HOT CHOCOLATE
Yield: about 4 cups (2 large servings)

1/3 cup nonfat dry milk powder
1/3 cup sugar
1/4 cup cocoa powder (a variety of the finest cocoas of your choice)
pinch of salt
1 cup milk
3 cups ice

for serving:
whipped cream (1 cup cream whipped with 1 tsp. vanilla extract + 1-2 tbsp. sugar)
chocolate shavings


1.      Mix dry milk, sugar, cocoa and salt in a small bowl.
2.      In a blender (in this order) add milk, dry cocoa mix and ice.
3.      Blend for 20-30 seconds until smooth daiquiri-like texture.
4.      Pour into a large glass; top with whipped cream and shaved chocolate.
Serve with a spoon and straw.

barely adapted from CBS news (originally from Serendipity 3, NYC)
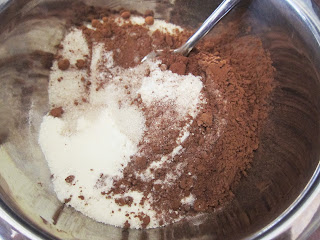
mixing together the cocoas, dry milk, sugar and salt 

Apparently Serendipity uses a secret blend of 14 cocoas
(you heard me), but since no one has that in their cabinet,

I used a combination of the 4 cocoas I was pleasantly
surprised to find in my kitchen (Scharffen Berger, Callebaut,
Ghiardelli and Valrhona - not too shabby).
milk, cocoa mixture & ice layered in the blender
blended
frozen hot chocolate
You can see in the photo up top that my whipped cream
was a little on the loose side. I also didn't bother making
chocolate shavings and just sprinkled a touch of cocoa
powder on top (really just for the photo).
.

Saturday, July 20, 2013

Nutella-Stuffed Brown Butter Chocolate Chip Cookies with Sea Salt

Here's a cookie for the chocolate chip cookie lover who wants to add a few embellishments to take their cookies to the next level. Between the brown butter (which adds a nice nuttiness) and the rich, creamy Nutella, it's already a winner. But sprinkling sea salt on top is what keeps them from being cloying and probably what makes them so irresistible. 

I don't know how often I'll make these...to be honest, stuffing each dough ball with Nutella is kind of a pain-in-the-ass. Mostly because it's hard to get the dough very flat (since it's full of chips) and so it cracks. And the longer you sit there making them, the warmer (and oozier) the Nutella gets, so the harder it gets to encase it in the dough without it escaping through the cracks I mentioned earlier. Of course the more I eat them, the foggier my memory gets.


NUTELLA STUFFED BROWN BUTTER
CHOCOLATE CHIP COOKIES WITH SEA SALT
Yield: 1 1/2 to 2 dozen large cookies

2 sticks (1 cup) unsalted butter
2 1/4 cups all-purpose flour
1 1/4 teaspoons baking soda
1/4 teaspoon fine salt
1 1/4 cups packed dark brown sugar
1/4 cup granulated sugar
1 large egg + 1 egg yolk
1 1/2 teaspoons vanilla extract
1 tablespoon plain Greek yogurt or sour cream
1 cup bittersweet chocolate chips
3/4 cup milk chocolate chips
1 cup Nutella, chilled in refrigerator
coarse sea salt for sprinkling
_______________________________________________________________________

1.      Melt butter in a saucepan over medium heat. When it begins to foam, start whisking constantly. After a couple of minutes, the butter will begin to brown on the bottom of the saucepan; continue to whisk and remove from heat as soon as the butter begins to brown and give off a nutty aroma. Immediately transfer the butter to a large mixing bowl (to prevent burning). Set aside to cool for a few minutes.
2.      In a separate bowl, whisk together the flour, baking soda, and salt and set aside.
3.      With an electric mixer, mix the butter and sugars until thoroughly blended. Beat in the egg, yolk, vanilla, and yogurt until combined. Add the dry ingredients slowly and beat on low-speed just until combined. Gently fold in all of the chocolate chips.
4.      Chill the dough for 2 hours in the refrigerator.
5.      Preheat oven to 350º F. Line 3 baking sheets with parchment paper.
6.      Once dough is chilled, roll into balls (about 3-4 tablespoons each). Flatten each dough ball thinly into the palm of your hand. Place 2 teaspoons of chilled nutella in the middle and fold dough around it; gently roll back into a ball (it doesn’t have to be perfectly round). Make sure that the nutella is not seeping out of the dough. Add more dough if necessary. Place dough balls about 3 inches apart on baking sheet and very gently flatten just the tops with your hand.
7.      Bake cookies for 12-15 minutes or light golden brown. They will look a bit underdone in the middle, but will continue to cook once out of the oven.
8.      Immediately sprinkle with a little coarse sea salt while still warm. Let cookies cool completely before removing from baking sheets.

slightly adapted from ambitiouskitchen.com
melted butter getting foamy
brown butter
adding the sugars
adding the egg, vanilla & yogurt
adding the flour mixture
adding the chocolate chips

I used Ghiardelli...for some reason they're gigantic.
I think that might be one of the reasons my dough
was hard to flatten.
dough all mixed
chilled Nutella
Nutella on flattened dough ball
rolled back into a ball

I forgot to flatten the tops of mine
like the recipe says. Oh well.
baked
sprinkling with salt

I was kind of generous with the salt
(I figured some of it would fall off).
Nutella Stuffed Brown Butter
Chocolate Chip Cookies with Sea Salt
.

Saturday, July 13, 2013

Ball Whisk

I haven't been cooking up anything new this week, so it feels like a good time for a favorite things post...and I can't think of a kitchen utensil more deserving of the honor than the ball whisk. Maybe you already own (and no doubt love) one, but just in case, I feel it's my duty to put it on your radar. Honestly, I can't even remember where I got mine. I don't know if it was a gift (sorry to whoever bought it for me if it was) or if I picked it up myself, but all that really matters is I use it a lot. Why did I take a picture of it in front of the cat? Well, I thought it might help show the scale, but then I realized that you don't know how big my cat is, so that was a bad idea. But then I thought people love to look at cats on the internet, so I threw it up here anyway, even though Pierre was freaked out and quickly ran off, so the photo isn't even good.

So why do I love my ball whisk so much you ask? Thanks for asking. Let me count the reasons...I love it because:
1.   it whips/aerates faster than traditional whisks since the wires move independently
2.   it gets into the edges of pans and bowls
3.   the balls on the ends help break up and incorporate food bits
4.   clumps of food don't get stuck inside while you're whisking (like with balloon whisks)
5.   it's way easier to clean because you can separate the wires
6.   when other utensils get tangled in it inside your drawer, they're easily freed just by
separating the wires
7.   it looks cool
I guess my hand gives you an idea of the whisk's size, although
for all you know, I have freakishly large or small hands.

So there you have it. I love my ball whisk and I don't care who knows it. Also, I just realized that I should just measure it and it's 11 inches long. That would have been easier, but slightly less fun, than terrorizing the cat.
The ball whisk in action (making okonomiyaki).
.

Wednesday, July 3, 2013

Roasted Strawberry Buttermilk Ice Cream

Jeni Britton Bauer of Jeni's Splendid Ice Creams is definitely my ice cream hero. Or I guess she's my ice cream heroine. Which does seem more appropriate because ice cream is my heroin. When I saw this recipe in her book, I was curious to see how roasting strawberries might transform them. But it didn't really do that - it just concentrated the flavor (which is a good thing, don't get me wrong). So in the end, it was a very good strawberry ice cream, but you probably wouldn't be able to tell it apart from a non-roasted strawberry ice cream. Although the buttermilk does give it a nice little tang. I don't think I'll crave it, like I do the pistachio-honey, but believe me, I wouldn't turn my nose up at a bowl.

 
ROASTED STRAWBERRY BUTTERMILK ICE CREAM
Makes about 1 quart

1 pint strawberries, hulled and sliced 1/2-inch thick
1/3 cup + 2/3 cup sugar, divided
3 tablespoons lemon juice
1 1/2 cups whole milk
2 tablespoons cornstarch
2 ounces cream cheese, softened
1/8 teaspoon fine sea salt
1 1/4 cups heavy cream
2/3 cup sugar
2 tablespoons light corn syrup
1/4 cup buttermilk


1.      Preheat oven to 375º F. Combine strawberries with 1/3 cup sugar in an 8" square glass or ceramic baking dish, stirring gently to mix well. Roast for 8 minutes, or until just soft. Let cool slightly. Puree in a food processor with lemon juice. Measure 1/2 cup of the pureed berries and set aside. Refrigerate the remaining puree.
2.      Mix about 2 tablespoons of the milk with the cornstarch in a small bowl to make a smooth slurry. Whisk the cream cheese and salt in a medium bowl until smooth. Fill a large bowl with ice and water.
3.      Combine the remaining milk, cream, 3/4 cup sugar and corn syrup in a 4-quart saucepan, bring to a rolling boil over medium-high heat, and boil for 4 minutes. Remove from the heat and gradually whisk in the cornstarch slurry. Bring the mixture back to a boil over medium-high heat and cook, stirring with a heat-proof spatula, until slightly thickened, about 1 minute. Remove from heat.
4.      Gradually whisk the hot milk mixture in to the cream cheese until smooth. Add the buttermilk and reserved strawberry puree and blend well. Pour the mixture into a 1-gallon Ziploc freezer bag and submerge the sealed bag in the ice bath. Let stand, adding more ice as necessary, until cold, about 30 minutes.
5.      Pour the ice cream mixture into the frozen canister of electric ice cream freezer and run according to directions of ice cream maker. Pack the finished ice cream into a storage container, press a sheet of parchment directly against the surface, and seal with an airtight lid. Freeze in the coldest part of your freezer until firm, at least 4 hours.
6.      Serve with refrigerated strawberry puree poured over the top.

strawberries
sliced strawberries mixed with sugar
roasted strawberries
strawberry puree

The recipe doesn't say to strain out the seeds,
but I did (it just seemed like a good idea).
mixing the cornstarch/milk slurry
adding the slurry to the hot milk/cream/sugar mixture

I used brown rice syrup as a substitute for corn syrup.
softened cream cheese and salt
mixing cream cheese with hot milk mixture
adding buttermilk
mixing in strawberry puree
strawberry custard

I cooled it off in the bowl in an ice bath
(I didn't use a ziploc like the recipe says).
strawberry custard in ice cream maker
ice cream
Instead of pouring the extra strawberry puree
over the ice cream, I decided to mix some into
the ice cream (for a little extra color and flavor).
roasted strawberry buttermilk ice cream
.