Showing posts with label dairy. Show all posts

Sunday, April 3, 2011

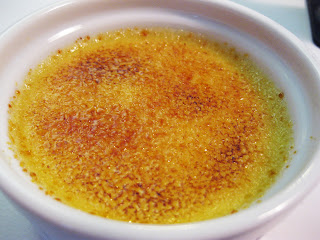
Vanilla Bean Crème Brûlée

This is your classic crème brûlée recipe with no embellishments (not that it needs any). Although I did intend to serve it garnished with raspberries and totally forgot (typical of me). This is so rich and creamy, just a little goes a long way. It's perfect for serving to company because it needs to be made ahead. Plus you can torch it right at the table for the ooh/ahh factor.


VANILLA BEAN CRÈME BRÛLÉE
Serves 6

2 cups whipping cream
1/2 cup sugar, plus 1/4 cup for sprinkling on top
1 vanilla bean, split lengthwise
5 large egg yolks


Make custard:
1.      Preheat oven to 325° F. Place 6 (4-inch) ramekins or fluted dishes in 1 large baking pan with sides (or divide among 2 smaller pans).
2.      Mix cream and 1/2 cup sugar in heavy medium saucepan. Using small sharp knife, scrape seeds from vanilla bean. Add seeds and bean to saucepan. Stir over medium heat until sugar dissolves and mixture comes to simmer. Cover pan, reduce heat to very low and simmer gently 10 minutes to infuse flavors. Strain into large measuring cup.
3.      Whisk yolks in medium bowl until well blended. Gradually whisk in hot cream mixture just to blend. Return custard to measuring cup; divide among ramekins. Place the pan(s) in the oven and pour in enough hot water to come halfway up sides of the ramekins.
4.      Bake custards until almost set in center when pans are gently shaken, about 30 minutes. Using metal spatula, transfer custards in dishes to work surface; cool for 30 minutes. Chill for at least 3 hours and up to 2 days.

Make crème brûlée:
1.      Sprinkle 2 teaspoons sugar evenly over each custard. Working with 1 custard at a time, hold torch* so that flame is 2 inches above surface. Direct flame so that sugar melts and browns, about 2 minutes. *If you don’t have a blowtorch, you can broil the custards until the sugar turns dark brown.
2.      Let stand for 1-2 minutes, so the sugar can harden. Serve immediately (or refrigerate again, for no more than 4 hours, so the topping stays brittle).

adapted from Bon Appétit, February 1999
cream, sugar and vanilla bean (with seeds scraped out)
yolks
adding hot cream mixture to yolks (pour
slowly and keep whisking so the eggs don't cook)
straining the custard
pouring the custard into the ramekins
ramekins in their hot water bath
out of the oven and cooling
sprinkled with sugar
torch
torching
torched
those little black dots are vanilla seeds (yum)

You may have noticed that I only made five (and not six like the recipe says). That's because I only have five ramekins (of varying sizes and colors). But that's okay, I just cooked them slightly longer. Maybe one day I'll buy some of those low, wide, fluted ramekins...they're pretty. Luckily for me, I don't have company over who minds mismatched ramekins (actually, that's by design more than luck).
.

Friday, February 25, 2011

Crème Fraîche

Riding high after successfully making homemade ricotta cheese, I saw a recipe for homemade crème fraîche and decided to keep the momentum going (really I just wanted to use up some extra buttermilk I had no plans for, but the momentum thing sounds more exciting).

If you've never had crème fraîche (pronounced krem-fresh), it's a French soured cream (tangy like regular sour cream, but a bit thinner). It's used as a sauce or topping for both savory and sweet dishes. It's more expensive than sour cream and not always as easy to find (which is great motivation for making it yourself at home).


CRÈME FRAÎCHE
Yield: 2 cups

1 pint heavy cream
1/4 cup cultured buttermilk


1.      Heat the heavy cream to lukewarm, about 100º F. Remove from heat and stir in the buttermilk. Pour the mixture into a 1-pint glass container.
2.      Cover with a clean kitchen towel.  Leave in a warm spot (away from drafts) and let sit until it has thickened and has a slightly sour, tangy flavor, 18-36 hours (time depends on the temperature of your kitchen).
3.      Stir and refrigerate for another 24 hours before using. Can be refrigerated for up to 2 weeks.

This recipe is a compilation of many recipes I read online and one from Peter Berley.

lukewarm milk with buttermilk added
I made a double batch in a 1-quart jar
I used a rubber band to keep my towel on (looks like the sheik of dairy)
after 18 hours
after 20 hours
at 29 hours (jackpot!)

Here are some recipes I've made with crème fraîche: Salmon with Watercress-Herb Salad and Lemon Sauce, Mashed Potatoes with Fennel & RosemaryTagliatelle with Mustard-Crème Fraîche Sauce and Pears Poached in Red Wine.

Friday, February 11, 2011

Ricotta Tart with Dried-Fruit Compote

If you're thinking I made this tart just so I could use my homemade fresh ricotta cheese, you're right! I was so proud of my ricotta (and the fact that I successfully made cheese of any kind) that I really wanted to show it off and not just bury it in pasta and sauce (just this first time, because now that I type it, being buried in pasta and sauce sounds pretty great). 

This tart is kind of like a light, subtle cheesecake. Not heavy or too sweet. And the dried fruit compote complements it nicely.
RICOTTA TART WITH DRIED-FRUIT COMPOTE
Makes 8 to 10 servings

tart shell:
1 cup unbleached all purpose flour
3 tablespoons sugar
1/2 teaspoon salt
1 stick unsalted butter, cold and cut into 1/2-inch cubes
1 teaspoon grated lemon zest
1 large egg yolk
1/2 teaspoon pure vanilla extract
1 tablespoon water

ricotta filling:
3 ounces cream cheese, softened
1/4 cup sugar
1/8 teaspoon cinnamon
3/4 pound ricotta (preferably fresh)
1 large egg + 1 large egg white, lightly beaten
1/8 teaspoon salt

fruit compote:
2 1/2 cups water
2 1/2 cups dry white wine
1/2 cup plus 2 tablespoons sugar
1/2 vanilla bean, split lengthwise (or ½ teaspoon vanilla extract)
3 (3” x ½”) strips of lemon zest
1 cup dried Calmyrna figs (5 ounces), stems trimmed and cut in quarters
1/2 cup dried California apricots (3 1/2 ounces), cut in halves or quarters
1/4 cup dried sour cherries (3 ounces)


Make shell:
1.      Preheat oven to 375° F. with rack in middle. Generously butter a 14” x 4” rectangular tart pan with removable bottom (or an 8” round tart pan with removable bottom).
2.      Pulse flour, sugar, and salt in a food processor until combined. Add butter and zest and pulse until mixture resembles coarse meal with some small (roughly pea-size) butter lumps. Add yolk, vanilla, and water and pulse until just incorporated and dough begins to form large clumps.
3.      Turn out dough onto a work surface and knead for about 1 minute or until dough can be gathered easily into a ball. Flatten dough into a rectangle.
4.      Press dough over bottom and up sides of pan in an even layer. Chill for 45 minutes.
5.      Lightly prick shell all over with a fork, then line with foil and fill with pie weights. Bake shell until sides are set and edge is golden, about 20 minutes. Carefully remove weights and foil and bake until shell is golden all over, about 15 minutes more. Cool shell completely in pan on a rack. (Leave oven on.)
Make filling:
6.      Beat together cream cheese, sugar, and cinnamon in a bowl with an electric mixer at medium-high speed until light and fluffy, about 2 minutes. Reduce speed to low and mix in ricotta, whole egg and egg white, and salt until just combined.
7.      Pour filling into cooled tart shell and bake until slightly puffed along edges and just set in center, about 15 minutes (center will tremble when tart is gently shaken). Transfer to a rack and cool completely. Loosely cover tart with plastic wrap and chill until filling is firm, at least 8 hours.  Tart can be chilled for up to 2 days. Cover tightly after 8 hours. Bring to room temperature before serving if desired.
Make compote:
8.      Bring water, wine, sugar, vanilla bean (if using), and zest to a boil in a heavy medium saucepan over medium heat, stirring until sugar has dissolved. Stir figs into syrup and simmer, uncovered, for 3 minutes. Stir in apricots and simmer for another 2 minutes. Stir in cherries and simmer for 1 more minute. Remove fruit to a bowl using a slotted spoon.
9.      Boil syrup until reduced to about 1 cup, about 15 minutes. Discard lemon zest and vanilla bean (or if using extract, stir in now), then pour syrup over fruit and cool to room temperature. Serve compote with tart.  Compote can be made 3 days ahead and kept in an airtight container at room temperature.

adapted from Gina Marie Miraglia Eriquez

dough before kneading and gathering into a ball
dough flattened to roughly the shape of the pan
(I actually ended up using my rolling pin a little to help flatten.)
dough pressed into pan
I've never bothered with pie weights, old leftover beans
or rice work just as well (and they're cheaper too)
baked crust

I did have some shrinkage on the sides (because I was impatient
and didn't let the dough rest/chill long enough in the fridge).

So, don't do that. I also bumped the crust on the top of the oven
when I was pulling it out.  Not my finest hour, but once I cut
the tart into slices, it wasn't really that noticeable.
mixing the filling
filled, but not baked yet

I was concerned the crust's edges might burn because
it was already a nice shade of brown after blind baking,
so I used tin foil to cover the edges.
Aside from the crust looking a little wonky
(okay, very wonky), it turned out great

Sorry I forgot to take photos of the making of the fruit compote. But there was nothing terribly exciting or complicated about it, so you didn't miss much.

Thursday, February 10, 2011

Fresh Ricotta Cheese

straining the curds
Until I happened upon this recipe, it never really occurred to me to make my own homemade fresh ricotta cheese.  But I was intrigued.  Is homemade ricotta really better than store-bought? That was the question. Because if it isn't, then why bother. 

Well, the answer is yes, homemade is better (come on, you knew it would be). It has a creaminess and freshness that sets it apart. Not to mention that you can make it with organic milk and feel really good about it. Plus when you consider how incredibly easy it is to make, why not do it just to say you did?


   FRESH RICOTTA CHEESE
Makes 1 1/2 cups

8 cups whole milk
1 teaspoon salt
3 tablespoons freshly squeezed lemon juice


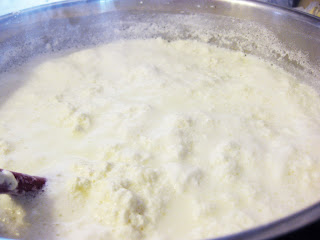
1.      Line a colander with cheesecloth; set in sink. Bring milk and salt to simmer in heavy large saucepan over medium-high heat. Stir in lemon juice. Let simmer until curds form, 1 to 2 minutes.
2.      Using finely slotted spoon or fine mesh strainer, scoop curds from pan and transfer to the colander. Let drain for 2-3 minutes (curds will still be a little wet).
3.      Transfer curds to a bowl. Cover and store in the refrigerator. Ricotta is best the same day, but can be made 2-3 days ahead. 

adapted from Andrew Carmellini
curds forming
This being my first time and not knowing what to expect, I went way
overboard with the cheesecloth. In my defense, I was just following
the original recipe, which said to use 4 layers. But that's totally
unnecessary (just one is plenty)
.

I used my fresh ricotta to make a nice ricotta tart with dried-fruit compote.