Showing posts with label favorite things. Show all posts

Saturday, July 13, 2013

Ball Whisk

I haven't been cooking up anything new this week, so it feels like a good time for a favorite things post...and I can't think of a kitchen utensil more deserving of the honor than the ball whisk. Maybe you already own (and no doubt love) one, but just in case, I feel it's my duty to put it on your radar. Honestly, I can't even remember where I got mine. I don't know if it was a gift (sorry to whoever bought it for me if it was) or if I picked it up myself, but all that really matters is I use it a lot. Why did I take a picture of it in front of the cat? Well, I thought it might help show the scale, but then I realized that you don't know how big my cat is, so that was a bad idea. But then I thought people love to look at cats on the internet, so I threw it up here anyway, even though Pierre was freaked out and quickly ran off, so the photo isn't even good.

So why do I love my ball whisk so much you ask? Thanks for asking. Let me count the reasons...I love it because:
1.   it whips/aerates faster than traditional whisks since the wires move independently
2.   it gets into the edges of pans and bowls
3.   the balls on the ends help break up and incorporate food bits
4.   clumps of food don't get stuck inside while you're whisking (like with balloon whisks)
5.   it's way easier to clean because you can separate the wires
6.   when other utensils get tangled in it inside your drawer, they're easily freed just by
separating the wires
7.   it looks cool
I guess my hand gives you an idea of the whisk's size, although
for all you know, I have freakishly large or small hands.

So there you have it. I love my ball whisk and I don't care who knows it. Also, I just realized that I should just measure it and it's 11 inches long. That would have been easier, but slightly less fun, than terrorizing the cat.
The ball whisk in action (making okonomiyaki).
.

Wednesday, January 2, 2013

Rao's Marinara Sauce

I consider this both a "favorite things" post and a recipe post because Rao's is hands down my favorite jarred marinara sauce ever. Some of you may have seen it at the grocery store and just kept walking because it's pretty pricey. Okay, very pricey. I've seen the larger jars sell for over $10. But I would submit to you that if you have the money in your budget, it's worth it. And it does go on sale sometimes. It was only $5.99 the other day at the A&P, so I bought 10 jars. Okay, it was 12 jars. I felt a little stupid at the register, but now I feel comforted knowing they're in my basement. I feel the same way about our fifty pack of toilet paper and my industrial size box of tampons. 

Now even though Rao's jarred sauce is great, I do like to make homemade sauce when I can, so it occurred to me that maybe I could find the Rao's recipe online. I didn't have to look far (it's on their website). So I made it and it rivaled the jarred stuff (which is a weird thing to say because usually it's a miracle if something in a jar can compare to homemade, not the other way around). But in this case, rivaling the jar was a good thing. But don't take my word for it, go ahead and give it a try.


RAO’S MARINARA SAUCE
Yield: 7 cups

4 (28 oz.) cans imported Italian plum tomatoes with basil, preferably San Marzano
1/2 cup extra virgin olive oil
4 oz. fatback or salt pork, cut in small pieces (optional)
6 tablespoons minced onion
4 garlic cloves, peeled and minced
salt to taste
12 leaves fresh basil torn, optional
pinch dried oregano
black pepper, to taste
___________________________________________________________________

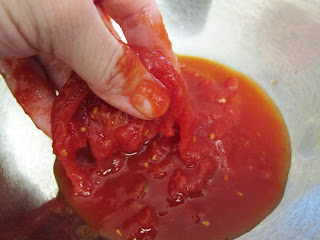
1.      Remove tomatoes from the can, reserving the juice in which they are packed. Using your hands, crush the tomatoes, gently remove and discard the hard core from the stem end and any skin or tough membrane. Set aside.
2.      Put oil in a large saucepan over medium-low heat. If using fatback, add to the pan and saute for about 5 minutes or until all fat has been rendered. Remove and discard fatback.
3.      Add onion and saute for 3 minutes or until translucent and just beginning to brown.
4.      Stir in garlic and saute for 30 seconds or until just softened.
5.      Stir in tomatoes, reserved juice, and salt. Raise heat, and bring to a boil. Immediately reduce heat to a very low simmer and cook for about 1 hour or until flavors have combined and sauce is slightly thickened. If you prefer a thicker sauce, cook for an additional 15 minutes.
6.      Stir in basil, oregano, and pepper, and cook for an additional minute. Remove from heat and serve.

jar of Rao's marinara sauce
(available at most supermarkets)
ingredients from the back of the jar

Obviously they don't use the pork
when they make this to sell in jars.
These were the only San Marzano tomatoes I could find.
crushing the tomatoes
salt pork
removing cooked salt pork
cooking onions
adding garlic
adding tomatoes
mixed and cooking
adding basil, oregano and pepper
homemade Rao's marinara sauce
.

Thursday, August 9, 2012

Steve Fries Gnocchi (video)

I'm really busy this week, so instead of posting a recipe, I'm sharing my favorite food video ever. It never fails to amuse me. I don't want to spoil it for anyone, so I won't describe what actually happens when Steve tries to fry his gnocchi. I'll just say that it's my idea of hilarious and Steve's laugh is so totally infectious that I dare you not to at least smile. If you don't, I hate to be the one to break this to you, but you're dead inside. Sorry. Although zombies are really hot right now, so there's that.

Steve fries gnocchi.


Enjoy!
.

Sunday, December 18, 2011

Matzo Ball Soup

This is really another "favorite things" post because the secret to my matzo ball soup is Manischewitz Matzo Ball Mix. I've tried (twice) to make matzo balls from scratch and I must be doing something wrong because they always turn out to be sinkers, instead of floaters. I guess that's okay if you like your matzo balls dense and chewy, but I prefer light and fluffy, so I keep coming back to the mix. And it makes great matzo balls, so I'm inclined to stick with it. I do think it's crucial to make your broth from scratch though. And I like to cook the matzo balls directly in the broth, instead of water. I love how they soak up all that chickeny goodness.


MATZO BALL SOUP
Yield: 10 servings (approx. 20 matzo balls)

Chicken Stock:
1 whole chicken (about 6 lbs.), cut into 8 pieces
2 celery ribs, roughly chopped
4 carrots, roughly chopped (plus 5 more for serving in soup, if desired)
2 medium onions, unpeeled, trimmed and halved
1 head garlic, cut in half crosswise
1 handful of parsley, with or without stems (about 3/4 cup)
1-inch piece fresh ginger root, peeled and roughly chopped
zest peeled from 1/2 lemon (not grated)
1 dried bay leaf
1 teaspoon salt
1/2 teaspoon black peppercorns
5 quarts cold water

Matzo Balls:
1 box Manischewitz Matzo Ball Mix (use both packets)
4 large eggs
1/4 cup vegetable oil


Chicken Stock:
1.      Bring all ingredients to a boil in a large, heavy stock pot. Skim froth. Reduce heat and gently simmer, uncovered, skimming froth occasionally, for 3 hours.
2.      Pour broth through a fine-mesh sieve (or cheesecloth) into a large bowl and discard solids. Cool stock completely, uncovered. Once cool, chill (covered), in the refrigerator.
3.      Skim off the fat (once chilled, it rises to the top and is easy to scoop off). This is schmaltz (the Yiddish word for chicken fat).

Matzo Balls:
1.      Follow the instructions on the back of the matzo ball mix box (use both packets, 4 eggs and 1/4 cup oil). But instead of water, bring chicken stock to a boil. Be sure not to salt your chicken stock before you cook your matzo balls (otherwise they’ll soak up a lot of salt and get too salty). Continue to follow the instructions for forming and cooking the matzo balls.

Soup:
1.      If you like your soup with carrots, peel them and chop into 2-inch pieces. Add to the hot broth and cook until tender (about 8 minutes).
2.      Season broth with salt and pepper to taste (DO NOT season the broth before cooking the matzo balls or they will be too salty).  Ladle soup and matzo balls into bowls; serve hot.
Belle & Evans organic chicken
chicken cut up and in the pot
everything else added
stock cooking (I let it go all day)

I forgot to take photos of straining the stock, but obviously
I did. Once cooled, I put the stock in 1-quart containers
and chilled overnight so the fat would rise to the top.
scooping off the schmaltz (chicken fat)
You can save the schmaltz in the refrigerator or freezer and use for cooking.
You can see this rich, delicious stock is kind of gelatinous when
cold. It will melt and become liquidy again when you heat it up.
matzo ball mix box
cooking instructions on the back
cracking an egg
adding oil

I tried adding schmaltz once instead, but when you're already
cooking the matzo balls in chicken stock, it's overkill.
adding the matzo meal mixture
mixed
formed into a ball
I often make mine two or three times
bigger and they still come out great.
boiling chicken stock
matzo balls cooking
ready
cooked matzo ball
matzo ball cross section
mmm...so comforting
ingredients

Not too bad, but I would like to successfully
make fluffy matzo balls from scratch one day.
.