Showing posts with label filo. Show all posts

Wednesday, February 20, 2013

French Onion Bites

If you ever wished you could eat a bowl of onion soup with your hands (without the pesky broth and second degree burns), then these French onion bites are for you. I suppose I made them a little less onion soupy by switching the bread in the recipe to little filo cups, so if you want the full experience, don't do that. But they were just so cute (and just so there in my freezer, which I cannot say for a freshly baked baguette).

FRENCH ONION BITES
Makes 36 hors d'oeuvres

1 baguette, sliced 1/4-inch thick (36 slices)
1 tablespoon unsalted butter
1 tablespoon olive oil
2 large onions, chopped (about 4 cups)
1 garlic clove, lightly crushed
1 small bay leaf
1 sprig fresh thyme
1/4 cup white wine
1 1/2 cups finely shredded Gruyere (using a microplane, about 3 oz.)
___________________________________________________________________________

1.      Preheat oven to 375°F with rack in middle.
2.      Arrange slices on a large baking sheet and bake in oven until golden, about 8 minutes. Let cool.
3.      Meanwhile, heat butter and oil in a 10-inch heavy skillet over medium heat until butter is melted, then cook onion, garlic, bay leaf, and thyme with 1/2 teaspoon salt and 1/4 teaspoon pepper, covered, stirring occasionally, 10 minutes.
4.      Uncover skillet and cook, stirring occasionally, until deep golden, about 10 to 15 minutes more. Add wine and cook until entirely evaporated, 1 to 2 minutes. Discard garlic clove, bay leaf, and thyme. Transfer to a small bowl and keep warm, covered.
5.      Preheat broiler.
6.      Arrange toasts on a large baking sheet, then top each with a rounded teaspoon of caramelized onions and sprinkle generously with shredded Gruyere. Broil 3- to 4-inches from heat until cheese is melted, 1 to 2 minutes (watch carefully).

Cooks' Notes:
•Onions can be caramelized 1 week ahead and kept chilled.
•Bread slices can be toasted and cheese shredded 3 days ahead. Keep toasts in an airtight container at room temperature and keep cheese chilled.

from Gourmet Live by Maggie Ruggiero

raw onions with garlic, thyme, salt and pepper
(I added the bay leaf right after I took this photo)
adding white wine to the caramelized onions
garlic, thyme and bay leaf removed
filo cups

I used frozen Athens Mini Fillo Shells.
filling with onions
topped with cheese
ready to bake
french onion bites
.

Saturday, March 5, 2011

Scallops Wrapped in Kataifi

Well, here we are, the last day of Greek week! I hope you enjoyed it as much as I did (it seems like we just got started and it's already over...sniff, sniff). Oh well, moving on.

Making this was very exciting for me because I've always wanted to try kataifi (pronounced kah-tah-EE-fee according to about.com). What is kataifi? Just shredded filo dough (that resembles a bird's nest when baked). In fact, I've seen people cook little nests of it in muffin tins and then fill them with goodies (a great presentation for candy easter eggs). It's easy to work with (and fun)! 

I thought this dish was scrumptious. The sweet scallops were great with the crunchy kataifi, fresh herbs, buttery/wine sauce and the reduced balsamic. Definitely a nice special occasion recipe for scallop lovers.

SCALLOPS WRAPPED IN KATAIFI
Makes 6 appetizers (1 per person)

1 cup balsamic vinegar
6 extra large sea scallops
salt and freshly ground black pepper to taste
1/4 lb. kataifi (shredded filo dough)
4 tablespoons unsalted butter, melted
1 plum tomato, diced
1/4 cup diced scallions
1/4 cup chopped fresh dill

butter sauce:
1 medium shallot, sliced
1 teaspoon chopped fresh thyme
1 cup white wine
1 stick unsalted butter, cut into small bits and chilled


1.      In a small saucepan over medium heat, simmer the vinegar until syrupy, about 20-30 minutes (don’t over reduce, it will thicken as it cools).
2.      Preheat oven to 450° F. Season the scallops with salt and pepper. Wrap each scallop in some of the kataifi filo. Arrange the scallops on a baking sheet and drizzle with the melted butter.
3.      Make the butter sauce: In a small saucepan, combine the shallot, thyme, and wine. Simmer until completely reduced and there is no liquid remaining. Over low heat and whisking constantly, add the butter, a few pieces at a time. Allow the butter to become creamy before adding the next few pieces. Do not boil or the butter will melt and the sauce will become oily. Season to taste with salt and pepper. Keep the sauce warm.
4.      Bake the scallops until just done, about 15 minutes.
5.      To serve, cut each wrapped scallop in half and place in the center of the plate. Spoon the butter sauce over the scallops. Drizzle with some of the reduced balsamic vinegar. Sprinkle the tomatoes, scallions and dill around the scallop.

adapted from Gregory Zapantis

scallops
fun!
wrapped
(you can't really go wrong because it's kind of a mess anyway)
before baking
after baking
cut in half, up close

Opa! I looked up the meaning of opa online and according to urbandictionary.com, opa is a word that Greek people use with no meaning at all. So I'm using it now to say "thanks for tuning in to Greek week!" Earlier I used it to say "you've got some kataifi in your teeth!"

i

Wednesday, March 2, 2011

Spanakopita

Spanakopita (pronounced span-a-kō-pee-ta) is commonly referred to as "spinach pie" (at least by us tongue tied Americans). It's usually spinach with feta, eggs and other herbs/spices baked in layers of filo dough. Yum. 

It can be made in either individually wrapped triangles (great for serving as hors d'oeuvres) or as one large "pie" (good for serving as a main course or side dish).

My daughter loved the triangles, so I thought "great, I'll make a pie for dinner."  Turns out to a 5-year-old's taste buds, a rectangle just doesn't taste the same as a triangle. Live and learn. 

SPANAKOPITA
Yield: about 40 triangles

filling:
3 tablespoons extra virgin olive oil
1 onion, chopped
1/2 cup chopped scallions, white and green parts
3 garlic cloves, minced
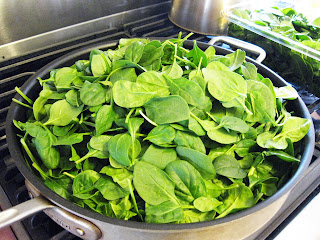
2 lb. fresh baby spinach, trimmed, washed and roughly chopped
juice of 1/2 lemon
2 eggs, lightly beaten
12 oz. crumbled feta
3 tablespoons fresh chopped dill
1 tablespoon coriander seeds, toasted and ground
1/2 teaspoon freshly grated nutmeg

assembly:
2 sticks unsalted butter, melted
1 lb. filo sheets, defrosted
1/4 cup finely chopped fresh oregano
1/4 cup finely chopped chives
1/2 cup grated parmesan


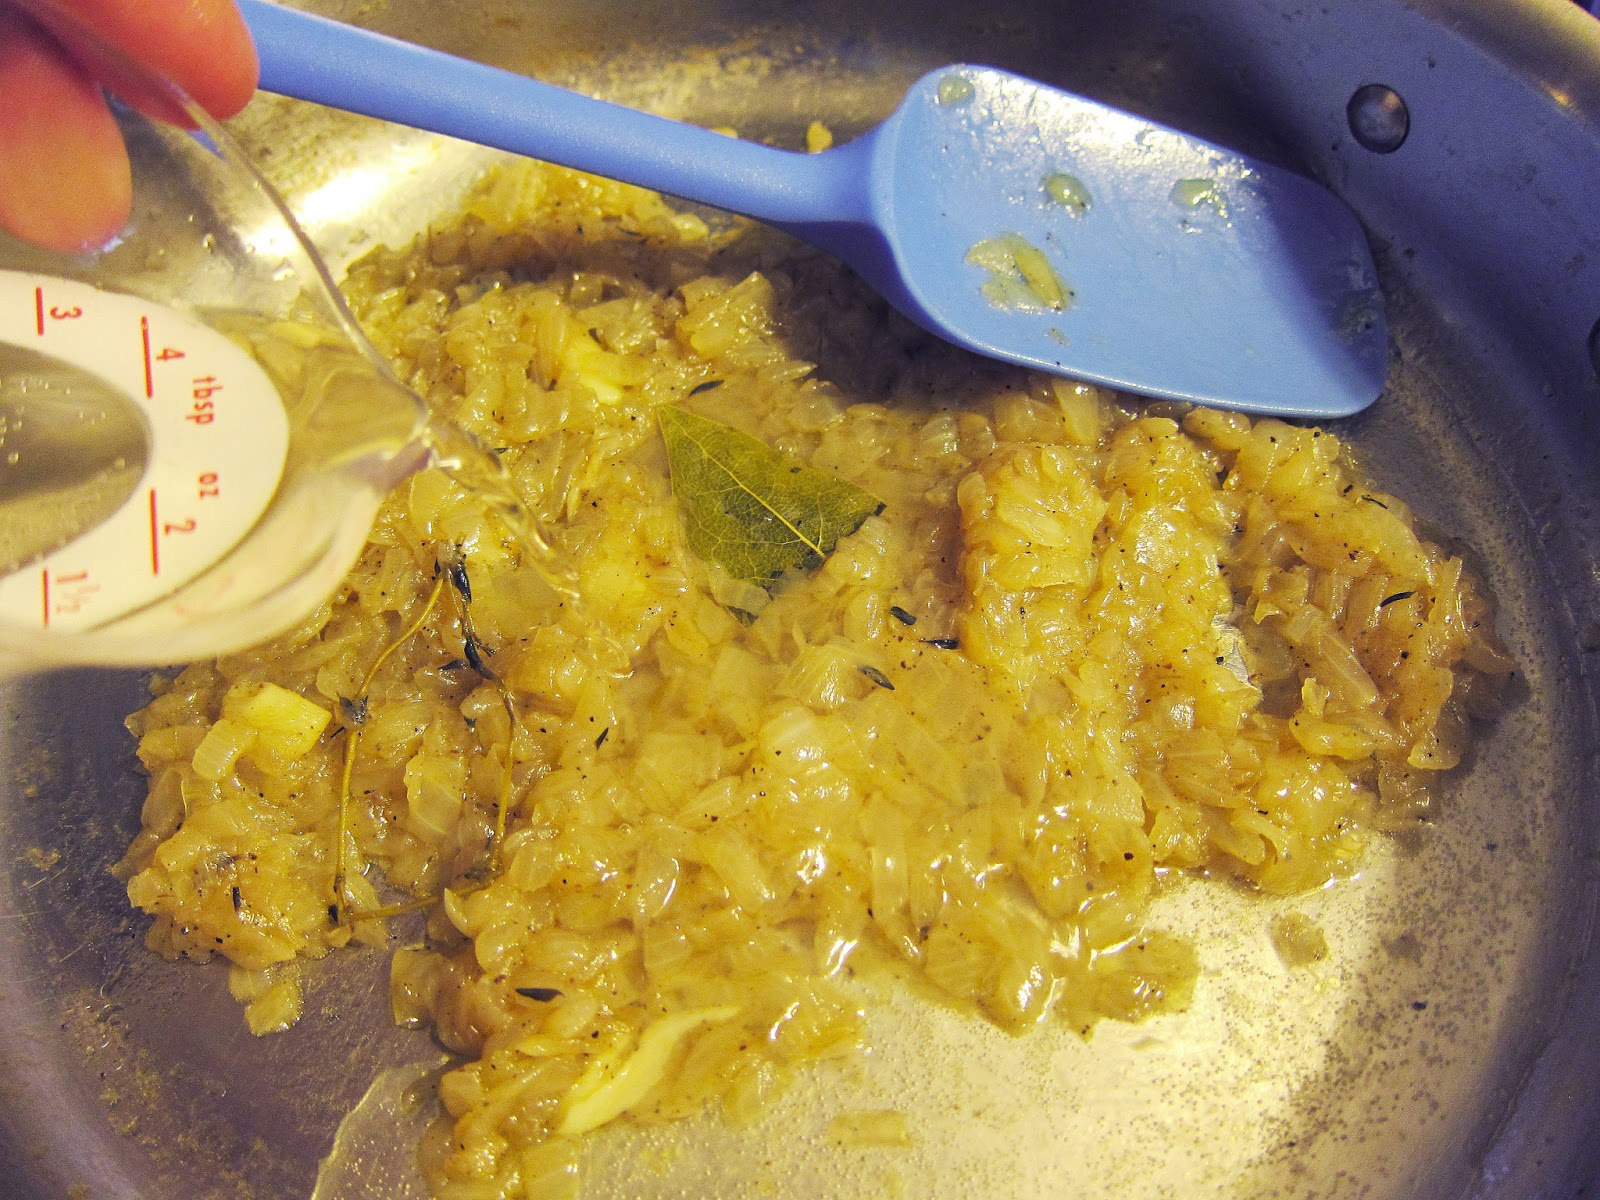
1.      Heat olive oil in a large skillet and place over medium heat. Saute onions and garlic for 3 minutes until soft. Add the spinach, season with salt and pepper, and continue to saute until the spinach is limp, about 2 minutes. Add lemon juice, remove from heat and place in a colander, and squeeze out excess liquid. Set aside to cool. The filling needs to be cool and dry to prevent the filo from becoming soggy. In a medium bowl, beat the eggs with feta, dill, coriander, and nutmeg. Season, then fold in the cooled spinach mixture until well blended.
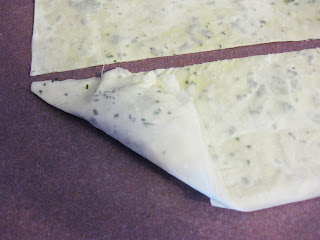
2.      Preheat oven to 350º F.  Brush 2 baking sheets with melted butter. Unroll the filo dough and lay a sheet flat on a work surface. Take care to keep the filo covered with a damp, not wet, towel as you work to prevent drying out and becoming brittle. Brush the sheet with melted butter, then sprinkle evenly with some oregano and chives. Repeat with 2 more sheets of filo, stacking on top of each other. With a sharp knife or pizza cutter, cut the sheets lengthwise into thirds to form 2 1/2-inch strips. Do this with remaining dough.
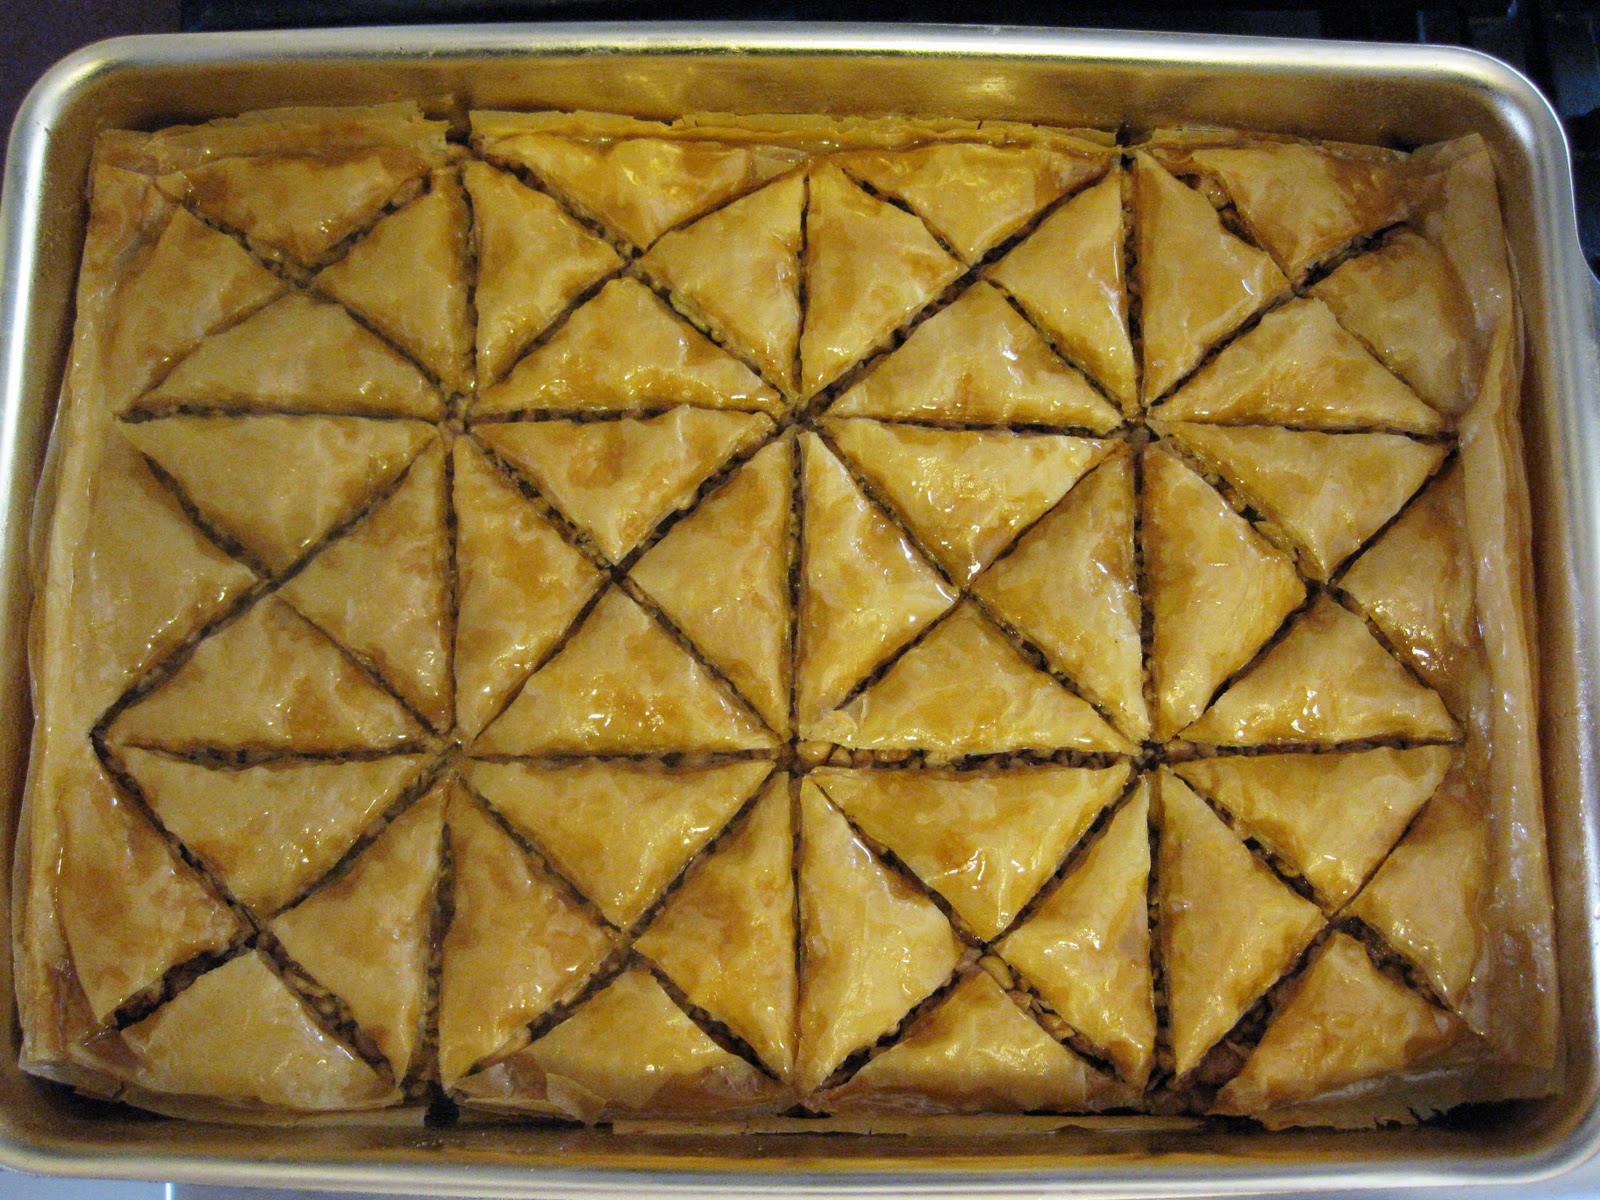
3.      Place a heaping teaspoon of filling near 1 corner of the layered filo strip. Fold the end at an angle over the filling to form a triangle. Continue to fold the triangle along the strip until you reach the end, like folding up a flag. Brush the top with butter and dust with Parmesan, place on prepared baking sheet, and cover while preparing the remaining pastries. Repeat until all the filling and filo strips are used up. Bake for 20 to 30 minutes until the triangles are crisp and golden. Serve hot, warm or cold.

Note:  Triangles can be formed, but not baked, 3 days ahead. Arrange in 1 layer in heavy-duty sealed plastic bags, then freeze. Bake frozen pastries in same manner as above (do not thaw).

adapted from Tyler Florence, Food Network
raw spinach
If it doesn't all fit, that's okay. It cooks down quickly
and then you can add more until it's all cooked.
see
toasting coriander seeds (just dry toast them until they become fragrant)
ground coriander seeds
filling all mixed
filo sheets brushed with butter and sprinkled with herbs
cut into strips
spinach near the corner
first fold
second fold (just keep doing that until you reach the end)
wrapped and sprinkled, but not baked yet
baked

If you want to make a spinach pie instead of triangles:
  Butter a 9" x 13" baking pan (I used a smaller one in the photos because I made some filling into triangles and some into a pie).  Cut filo sheets to fit your pan, if necessary.
  Layer 5-6 sheets of filo (brushing each sheet with butter). Sprinkle herbs between every 2-3 layers.
  Add half the spinach filling; spread evenly.
  Repeat 5-6 more filo/herb layers.
  Add remaining spinach filling; spread evenly.
  Top with 5-6 more layers of filo/herb layers (brush the top layer with butter, but don't sprinkle the top layer with herbs (they'll burn).
  Cooking time will be longer, bake until heated through and filo is golden brown (about 40 minutes).

filo/herb layers (I was very generous with the herbs)
spinach filling
top layer
baked
served

Saturday, December 18, 2010

Baklava

Filo, Fillo, Phyllo...personally I can't stand words that have more than two possible spellings (even two is annoying).  Don't get me started on Hanukkah, Hannukah, Chanukah, Chanukkah.  But I digress.  I love filo dough because it's simple to use but never fails to impress.  People who have never cooked with it think you've pulled off something complicated and fancy.  But the truth is that as long as the dough has been defrosted properly, it's a breeze.

This recipe is a little drier than most baklava (most use a wet syrup instead of straight up honey).  Both ways taste good if you ask me, I just like it this way because it's easier to cut and handle.
closeup of layers
  
BAKLAVA
Yield: 24 (or 48 mini)

16 oz. chopped walnuts (4 cups)
1/2 cup sugar
3/4 teaspoon ground cinnamon
8 oz. filo (phyllo) dough, defrosted*
1 1/2 sticks unsalted butter, melted (or more if needed)
12 oz. honey


Preheat oven to 300° F.  Brush a 13” x 9” baking dish with melted butter.
1.      In a large bowl, mix walnuts, sugar and cinnamon.
2.      The filo dough usually comes already cut in 13” x 9” rectangles (if not, cut to fit).  In baking dish, place 1 sheet of filo; brush with butter.  Repeat 5 more times to make 6 layers of filo altogether (brushing each layer with butter).  Sprinkle with 1 1/3 cups walnut mixture (spread evenly).
3.      Layer 6 more sheets of filo over walnut mixture (brushing each sheet with butter).  Sprinkle with 1 1/3 cups walnut mixture.  Repeat with 6 more layers of filo, remaining walnut mixture and 6 final layers of filo (brush top layer with butter too).
4.      Using a sharp knife, cut just halfway through layers in a triangle pattern to make 24 servings (cut lengthwise into 3 strips; cut each strip crosswise into 4 rectangles; then cut each rectangle diagonally into 2 triangles).  For minis: cut each triangle in half again to make smaller triangles.
5.      Bake for 1 hour and 25 minutes (or until top is golden brown).
6.      Heat honey in a small saucepan over medium-low heat until hot, but not boiling (honey should become thin).  Spoon hot honey evenly over hot baklava.  Cool in pan on wire rack for at least 1 hour, then cover with foil and let stand at room temperature.
7.      Finish cutting through layers with a sharp knife before serving.

*Filo dough can be found in the freezer section of most grocery stores. The dough will stick together if not fully defrosted.  The filo dough sheets are paper thin, so handle with care.  If left out for too long, the sheets will dry and crumble, so if this is your first time, and you're moving a little slowly, keep the remaining filo covered with a damp towel while you build the layers.
buttering the layers (it doesn't look pretty yet, but keep going)
walnut layer
cut into large triangles
cut into minis
done (just before honey is poured over)
after honey (ooh, shiny)
gifting

I usually make the mini size.  It's easier to pick up and you get more (I know it's the same amount, but you get more)!