Showing posts with label butter. Show all posts

Thursday, December 13, 2012

Green Beans with Herb Butter

I've been so busy lately that I'm still finding recipes I made on Thanksgiving and haven't posted yet. Like these green beans. I was so rushed on Thanksgiving, that the only photo of the actual green beans I managed to snap was this one of the finished product (half pinned down by some instrusive stuffing that seems to be battling it out for plate real estate).

This is an easy way to make fresh green beans with lots of flavor in very little time (assuming you make the herb butter the day before, which I did). Love the day before.


GREEN BEANS WITH HERB BUTTER
Makes 8 servings

Herb Butter:
5 tablespoons unsalted butter, softened
3 tablespoons finely chopped shallots
3 tablespoons finely chopped flat-leaf parsley
2 teaspoons finely chopped tarragon
2 teaspoons grated lemon zest
3/4 teaspoon salt, plus more for boiling water
1/4 teaspoon pepper

2 lb. green beans, trimmed
___________________________________________________________________

1.      Stir together all the herb butter ingredients in a large bowl until combined well.
2.      Cook beans in a large pot of boiling salted water (1 tablespoon salt for 6 quarts water), uncovered, until crisp-tender, about 6 minutes, then drain.
3.      Toss with herb butter.

Cooks' notes: Herb butter can be made ahead and chilled, covered, for 3 days (or frozen, rolled into a cylinder in plastic wrap and kept in a sealed bag, for 1 week). Green beans can be trimmed 1 day ahead and chilled in a sealed bag lined with paper towels.

barely adapted from Gourmet, November 2007 by Melissa Roberts
tarragon
shallots
lemon zest
all the herb butter ingredients
herb butter mixed
herb butter shaped into a log and wrapped
.

Sunday, June 17, 2012

Grilled Clams with Lemon-Ginger Butter

photo by Jamie Stanek
Not only are these clams easy to make, but they're probably unexpected at most cookouts (which automatically makes them more fun in my book). The lemon-ginger butter is so fragrant and flavorful; it makes a fantastic dipping sauce for the grilled baguette (which I did make, but forgot to take photos). If you're having this for dinner, you can always trade in the bread for pasta or rice and use the extra butter as your sauce.

So consider surprising your friends with grilled clams at your next cookout - but have a few hot dogs or hamburgers at the ready, because in my experience, people are either totally enamored with clams or completely repulsed by them (I like them, but I can see it).


GRILLED CLAMS WITH LEMON-GINGER BUTTER AND GRILLED BAGUETTE
Makes 2 servings

1/4 cup (1/2 stick) unsalted butter, softened
4 teaspoons minced shallot
1 tablespoon minced fresh parsley
1 teaspoon minced peeled fresh ginger
2 teaspoons finely grated lemon zest
6 (1/2-inch-thick) diagonal baguette slices
1/4 cup white wine
2 pounds Manila clams, scrubbed

Special Equipment: 13” x 9” x 2” disposable aluminum baking pan


1.      Preheat barbecue (high heat).
2.      Blend together butter, shallot, parsley, ginger and lemon zest in small bowl; season to taste with salt and pepper.
3.      Thinly spread lemon-ginger butter on 1 side of each bread slice.
4.      Place the remaining butter mixture and white wine in disposable aluminum pan. Arrange the clams in single layer in the pan. Place pan on grill, cover barbecue, and cook just until clams open, 8 to 10 minutes (discard any clams that do not open).
5.      Transfer grilled clams to 2 shallow bowls. Pour the pan juices over the clams.
6.      Grill bread until slightly charred, 1 to 2 minutes per side. Serve clams with bread.

slightly adapted from Bon Appétit, August 2009
butter, shallots, parsley, ginger & lemon zest
lemon ginger butter
clams on the grill

I know, I crowded my pan. I just didn't feel like
getting out another one. But they all opened.

If you don't have a grill, you can steam the
clams in a pot on the stove until they open.
grilled clams with lemon ginger butter
.

Thursday, June 23, 2011

Lime-Cilantro Butter

Recently I posted a recipe for corn with mint-feta butter and claimed I usually eat my corn-on-the-cob plain. I was telling the truth, but I can understand why you'd be doubtful (considering this photo of corn glistening with a fresh coat of lime-cilantro butter). But I didn't make the lime-cilantro butter for this corn at all, but rather as a topping for the ultimate snack food, popcorn.


It's been a while since I tested out a new popcorn flavor. I have to say, while lime-cilantro might not be the latest, greatest taste sensation to hit popcorn, it's pretty good. It does need to be made fresh though (I noticed the butter definitely loses something after a day or two in the fridge). Give it a try. And if you don't like the idea of drizzling it over your popcorn, I suppose you can always do something freaky, like spread it on your corn.


LIME-CILANTRO BUTTER
Serves 12

1 stick unsalted butter, softened
1 teaspoon lime zest
1/2 teaspoon sugar
1/2 teaspoon salt
1/4 cup chopped fresh cilantro
_______________________________________________________________________

Combine all ingredients in a medium bowl and mix well.

adapted from ‘Lulu Powers Food to Flowers: Simple, Stylish Food for Easy Entertaining’ by Lulu Powers
zesting limes (I didn't use all this zest just for this recipe)
cilantro
mixing everything
lime-cilantro butter
pouring melted lime-cilantro butter on air-popped popcorn
(of course you can pop yours any way you want)
.

Monday, May 2, 2011

Pan Seared Rib Eye with Blue Cheese-Shallot Butter


While I do think grilling is the best way to cook a big juicy rib eye, this method of pan searing is good for those of you who are grill deficient. It's also a good alternative for times when grilling isn't all that appealing, like during a wicked thunderstorm (as tasty as steak is, it's not really worth getting struck by lightening).

It's true, a good steak probably doesn't need any frills, but of course I added one anyway. We did slather our steaks with blue cheese-shallot butter, but I forgot to snap a photo. Sometimes when people are over for dinner, I get distracted and forget about the good people who read my blog (sorry). I'm sure you can use your imagination.


Making a compound butter is an easy, elegant way to add big flavor to vegetables or meats. This blue cheese-shallot butter is especially good with steak and corn-on-the-cob. And if you have any leftover, you can melt it into your mashed potatoes. Of course it's also delicious just spread on a good, hearty piece of bread. 

PAN SEARED RIB EYE

1 boneless rib eye steak, 1 1/2-inch thick
canola oil to coat
kosher salt and ground black pepper


1.      Place 10 to 12-inch cast iron skillet in oven and heat oven to 500º F. Bring steak(s) to room temperature.
2.      When oven reaches temperature, remove pan and place on range over high heat. Coat steak lightly with oil and season both sides with a generous pinch of salt. Grind on black pepper to taste.
3.      Immediately place steak in the middle of hot, dry pan. Cook 30 seconds without moving. Turn with tongs and cook another 30 seconds, then put the pan straight into the oven for 2 minutes. Flip steak and cook for another 2 minutes. (This time is for medium rare steaks. If you prefer medium, add a minute to both of the oven turns.)
4.      Remove steak from pan, cover loosely with foil, and rest for 2 minutes. Serve whole or slice thin and fan onto plate.

from Alton Brown
rib eye steaks (just look at that gorgeous marbling)
seared (before going in the oven)
ready to dig in

 ____________________________________________


BLUE CHEESE-SHALLOT BUTTER

4 tablespoons unsalted butter, at room temperature
2 tablespoons chopped shallots
2 tablespoons crumbled creamy blue cheese, such as Maytag Blue
2 teaspoons chopped fresh parsley
1/4 teaspoon salt
1/8 teaspoon freshly ground black pepper


Combine all ingredients in a bowl.  Blend until creamy and well mixed. Turn out onto a sheet of plastic wrap or waxed paper and form into a small log, about 1-inch in diameter. Cover and refrigerate until just firm, about 1 hour.

from Emeril Lagasse
beautiful blue cheese
chopped shallots
parsley
mixing it all together
well mixed
ready to roll
logged and wrapped
mmm
..

Tuesday, April 5, 2011

Double Chocolate Layer Cake

This year for her birthday, my daughter specifically requested a chocolate cake with white frosting. I know what you're thinking...doesn't she realize how much harder it is to frost a dark cake with light frosting?! There's just so much I still need to teach her. Anyway, when she said chocolate cake, I immediately thought of one I'd seen on The Today Show and always wanted to try.

But then I also thought of the daisy cake my friend Elizabeth had made recently and how good that was and reconsidered. I kept waffling. But since I had wondered about the first recipe for so long, I went ahead and made that one. It wasn't until after I baked it, that I looked at Elizabeth's recipe and discovered that they were the same!  Of all the chocolate cakes in the world...I guess it truly was meant to be. I did make mine with different frosting than the original recipe (per the birthday girl's request). I'm sure it's great with the original chocolate ganache.

Let me warn you right now; this cake a behemoth. The original recipe says it serves 12-14 (maybe 12-14 lumberjacks who have been stranded on a desert island for 30 days). I think it easily serves 20 party-goers (who probably all had breakfast, lunch and party food that day).


DOUBLE CHOCOLATE LAYER CAKE
Serves 20

3 ounces fine-quality semisweet chocolate such as Callebaut
1 1/2 cups hot brewed coffee
3 cups sugar
2 1/2 cups all-purpose flour
1 1/2 cups unsweetened cocoa powder (not Dutch process)
2 teaspoons baking soda
3/4 teaspoon baking powder
1 1/4 teaspoons salt
3 large eggs
3/4 cup canola oil or vegetable oil
1 1/2 cups well-shaken buttermilk
3/4 teaspoon vanilla
filling/frosting of choice (about 5-6 cups)


1.      Preheat oven to 300° F. and grease two 10- by 2-inch round cake pans (or three 9-inch round cake pans). Line bottoms with rounds of parchment paper.
2.      Finely chop chocolate and in a bowl combine with hot coffee. Let mixture stand, stirring occasionally, until chocolate is melted and mixture is smooth.
3.      Into a large bowl sift together sugar, flour, cocoa powder, baking soda, baking powder, and salt. In another large bowl with an electric mixer beat eggs until thickened slightly and lemon colored (about 3 minutes with a standing mixer or 5 minutes with a hand-held mixer). Slowly add oil, buttermilk, vanilla, and melted chocolate mixture to eggs, beating until combined well. Add sugar mixture and beat on medium speed until just combined well. Divide batter between pans and bake in middle of oven until a tester inserted in center comes out clean, 1 hour to 1 hour and 10 minutes.
4.      Cool layers completely in pans on racks. Run a thin knife around edges of pans and invert layers onto racks. Carefully remove wax paper and cool layers completely. Cake layers may be made 1 day ahead and kept, wrapped well in plastic wrap, at room temperature. Fill/decorate as desired.

slightly adapted from Engine Co. No. 28, Los Angeles CA (Gourmet, March 1999)

dry ingredients
cracking an egg
beaten eggs
coffee/chocolate mixture added
mixing in the dry ingredients

I like to slowly mix some in by hand before turning
the mixer back on to avoid getting floured (or cocoa powdered)
in the face (that's a lesson you learn the hard way).
batter
pouring batter into pan
I didn't have 10-inch pans, so I used three 9-inch pans
instead. If I had made two 10-inch layers, I probably would
have sliced them each in half and made a four-layer cake.
baked layers cooling
peeling off the parchment

- - - - - - - - - - - - - - - - - - - - - - - - - - - - - - - - - - - - - - - - -

COCONUT BUTTERCREAM
Yield: about 4 1/4 cups (enough to frost an 8” layer cake)

4 large egg whites at room temperature
1/2 teaspoon salt
1 1/4 cups sugar
1/2 cup water
1/2 teaspoon fresh lemon juice
3 sticks (1 1/2 cups) unsalted butter, cut into tablespoon pieces and softened
1 1/2 teaspoons coconut extract


1.      Combine egg whites and salt in bowl of a standing electric mixer or other large bowl.
2.      Stir together sugar and water in a small heavy saucepan and bring to a boil over moderately high heat, stirring until sugar is dissolved and washing down side of pan with a pastry brush dipped in cold water. When syrup reaches a boil, start beating whites with electric mixer at medium-high speed. Once whites are frothy, add lemon juice and beat at medium speed until they just hold soft peaks. (Do not beat again until sugar syrup is ready—see below.)
3.      Meanwhile, put thermometer into sugar syrup and continue boiling, without stirring, until it reaches soft-ball stage (238–242° F). Immediately remove from heat and slowly pour hot syrup in a thin stream down side of bowl into egg whites, beating constantly at high speed. Beat meringue, scraping down bowl with a rubber spatula, until meringue is cool to the touch, about 6 minutes. (It's important that meringue is fully cooled before proceeding.)
4.      With mixer at medium speed, gradually add butter 1 piece at a time, beating well after each addition until incorporated. (If meringue is too warm and buttercream looks soupy after some butter is added, chill bottom of bowl in a larger bowl filled with ice and cold water for a few seconds before continuing to beat in remaining butter.) Continue beating until buttercream is smooth. (Mixture may look curdled before all butter is added, but will come back together before beating is finished.) Add coconut extract and beat 1 minute more.

Can be made 1 week ahead and chilled, covered, or 1 month ahead and frozen. Bring to room temperature (do not use a microwave) and beat with an electric mixer before using.

from Gourmet, April 2001
frothy egg whites
sugar syrup boiling
soft peaks
pouring in the hot sugar syrup
meringue beating

This is really high because I made a double batch
(I had no idea how I was going to decorate the cake
and I wanted to make sure I had enough).
When you add the butter, the meringue does deflate
(so if you make a double batch like I did, don't worry,
it shouldn't overflow).
You can use any flavor extract you want (but try
not to spill way too much in by accident...it definitely
makes it taste a little funny). Yet another lesson
I learned the hard way.
buttercream
- - - - - - - - - - - - - - - - - - - - - - - - - - - - - - - - - - - - - - - - -

ASSEMBLING THE CAKE
My daughter liked the idea of filling the cake with
chocolate pudding (store-bought in this case;
I recommend Kozy Shack). So I piped some buttercream
around the perimeter (thicker than usual to ensure
the pudding would not ooze out the sides).
layer #2
One layer came out slightly higher than the other two.
I thought about slicing a little off the top to make them more
even, but I just put it in the middle as is (the clock was ticking
and I still didn't know how I was going to decorate the outside).
filling on top of layer #2
layer #3
applying the crumb coat (that's the first layer
of frosting that cements down all the loose crumbs)
crumb coat (refrigerate for at least 30 minutes)
You can see some crumbs, but now they won't get into the second layer.
second layer of frosting (no crumbs or cake visible)
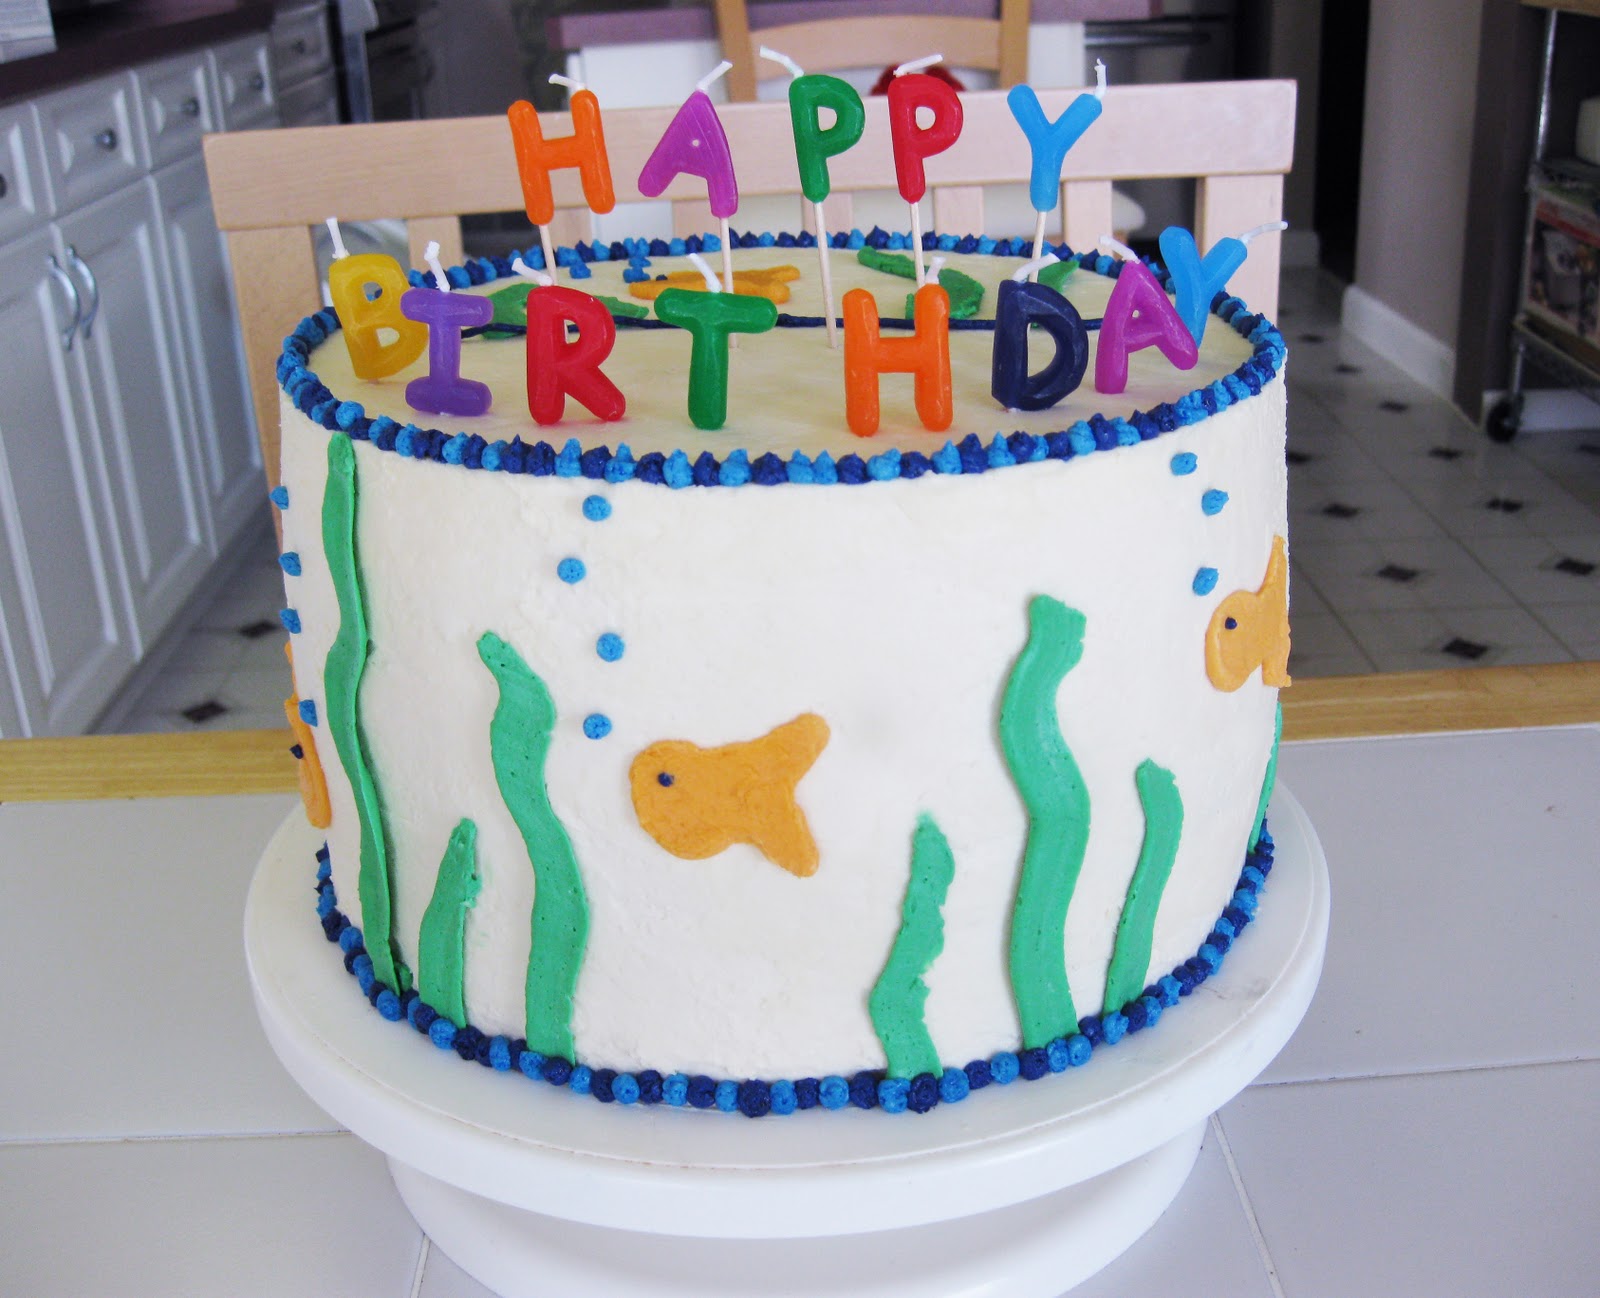
starting to decorate

 I decided last minute to go with a fish theme because we're
celebrating my daughter's birthday again this weekend with friends
at the aquarium (this cake was just for the family dinner). I
think we needed a few more families to come over and help us finish it!
.